Developing the Client App: Web Browsers, iOS SDKs, or Android SDKs (Part-2)
In this part of the blog, we will learn how a simple navigation app for web browsers can be developed using HTML, JavaScript, and Mapbox GL JS. If you have come directly to this page, you should first read the previous part of the blog here.
Part-1
Architecture of a Routing and Navigation App: significance of GIS and Necessity of a Middleware
Let’s move ahead with the next part.
Developing the Client App
When it comes to developing client apps for routing and navigation services, there are several options available. Web browsers, iOS SDKs, and Android SDKs are the most used platforms for developing these apps.
Developing the App for Web Browsers
Web browsers offer the advantage of being platform-independent, meaning that they can be accessed from any device with an internet connection. However, they are limited in terms of performance and user experience.
Developing the App for iOS SDKs and Android SDKs
iOS SDKs and Android SDKs offer a more robust development environment, allowing for better performance and a more immersive user experience. However, developing apps for these platforms can be time-consuming and requires specialized knowledge of the platform’s development tools.
In this blog, we will be discussing how can we develop a web browser-based client App for routing and navigation. We will use HTML, JavaScript, and Mapbox GL JS for our implementation.
(We are assuming that you are familiar with the basics of HTML and JavaScript)
Add necessary libraries to the HTML <head> for accessing Mapbox styles, maps, and APIs
| <head> <title>A Navigation App for Browser</title> <link href=’https://api.mapbox.com/mapbox-gl-js/v2.6.0/mapbox-gl.css’ rel=’stylesheet’ /> <script src=’https://api.mapbox.com/mapbox-gl-js/v2.6.0/mapbox-gl.js’></script> <style> .map { flex: 1; height: 710px; } </style> </head> | |
<body> of the HTML will display a base map on the client app. Depending on the objective of the app, the imported base map can be a satellite map, navigation map, tourist viewpoint map, etc.
| <body> <div class=”map” id=”map”></div> <script> var map = new mapboxgl.Map({ container: ‘map’, center: [7.5496,46.8147], zoom: 9, style: ‘mapbox://styles/mapbox/navigation-day-v1’ }); | |
Capture Source & Destination locations (with waypoints if required) by entering locations. Waypoints are additional stops in the route from source to destination. We will use mouse clicks for our purpose. Though a Geocoder can also be used to enter addresses manually.
| let startCoords, endCoords; map.on(‘click’, function(e) { if (!start) start = [e.lngLat.lng, e.lngLat.lat]; else if (!end) end = [e.lngLat.lng, e.lngLat.lat]; }); | |
Send a request to the REST API server (Python Middleware) using the proper HTTP method- POST / GET / PUT / PATCH / DELETE and get a response from the server.
WARNING: This is a development server Running on http://127.0.0.1:5000. Do not use it in a production deployment. Use a production WSGI server instead.
Here middleware has returned the Mapbox Directions API response which has two data components ‘RouteMain’ and ‘RouteAlt’ which is having geometries of one main route and one alternative route.
| //Send request to middleware which is a REST API server fetch(‘http://127.0.0.1:5000/mytrip’, { method: ‘POST’, body: `start=${start}&end=${end}` }) .then(response => { console.log(‘Response from Python Middleware :’,response); return response.json(); }) .then(data => { const routeMain = data.directionResp.routes[0].geometry; const routeAlt = data.directionResp.routes[1].geometry; }) | |
This response data will be used to display routes between source and destination over client base map. Here we are displaying the main route on the map. If you want you can also simultaneously display an alternative route in the same way by changing source coordinates to ‘coordinates’: routeAlt.coordinates.
Note, the Source name and layer id will be different for each layer.
| // Add data source and layer of the main route to map map.addSource(‘dirMain’, {‘type’: ‘geojson’, ‘data’: { ‘type’: ‘Feature’, ‘geometry’: { ‘type’: ‘LineString’, ‘coordinates’: routeMain.coordinates } } }); map.addLayer({ id: ‘dirMainLayer’, type: ‘line’, source: ‘dirMain’ paint: { ‘line-color’: ‘blue’, ‘line-width’: 13, } }); | |
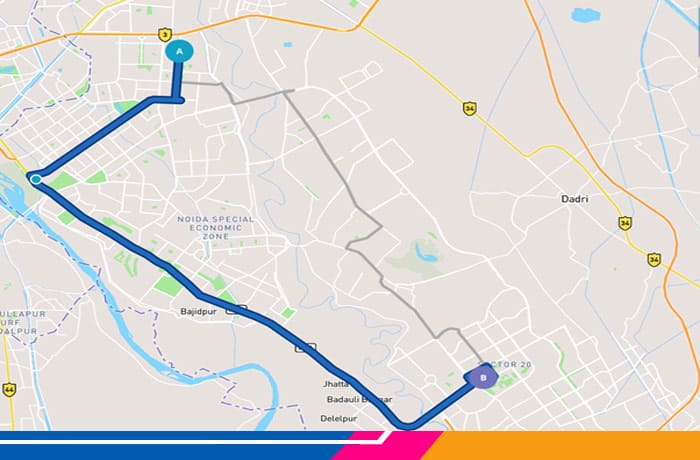
The final output on the client App/browser
The final output on the client app will display a map with a route from source to destination in blue along with an alternative route in grey.
Conclusion
Hope you guys enjoyed this blog and gained some basic understanding of how a client-side navigation app is developed. But the app is only complete and workable once we develop the middleware.
So in the final part of this blog, we will learn how easily middleware can be developed in Python using REST APIs.
-
 Everything about ECM: Its Benefit for Business 28-Mar-2024
 -
 Deep Tech and its Use Cases 26-Mar-2024
 -
 Kubernetes vs Docker: What are the Differences? 20-Mar-2024
-
Everything about ECM: Its Benefit for Business 28-Mar-2024
-
Deep Tech and its Use Cases 26-Mar-2024
-
Kubernetes vs Docker: What are the Differences? 20-Mar-2024